Saturday 29 December 2012

HOORAY!!

YAAAY!!! I finally could access my tastebook account. Don't know what happened but for quite a long time   the site couldn't be opened. It was a bit frustrating as I have really nice and tested recipes also , besides they were the ones that I really liked.
Anyway come and check my book out... you can see the link to it on the right in my blog's main page.
Hope you'll enjoy it.

Tuesday 25 December 2012

chicken noodle soup

Sooooo,
while I was making roast chicken roll I got some bones and chicken meat left that I saved and made this easy but tasty soup.
It has only few ingredients but I love it and make it quite often regardless if I have bones left from cooking some other dish or just some chicken pieces.
So while preparing other ingredients I put all my chicken left overs in a big pot covered it with water, added some salt and let it boil to cook.
so other ingredients that you will need:
1 medium potato, peeled and cut, I usually cut it french fries style, just like it this way
1 medium onion, finely sliced
1 big garlic clove, chopped
a couple of bay leaves
5-7 peppercorns
2 tbsp dried mushroom powder
2 handful of vermicelli or ABC pasta

Preparation:
when the chicken it ready I take it out to cool a bit leaving only the broth. Add some boiled water if there is not enough broth left. Bring to boil and add potato, onion, garlic, bay leaves, black pepper and mushroom powder. Stir and leave to cook. Sometimes I add about 1/2 grated carrot but I didn't have any left this time. When the potato is almost ready add pasta. If you use vermicelli it is enough just to bring to boil and cook for 1 minute then turn the heat off and let it stand for some time. With other small pasta I would recommend to cook for a couple of minutes.
Separate chicken meat from bones and add the meat to the soup.
Voila!!! It is ready. Enjoy!

** Someone must be asking where do I get this mushroom powder. Well first it is absolutely optional, second I just dried some mushrooms (button mushrooms, brown mushrooms) and then ground them in a coffee grinder. Simple as it is.

That's all for now...
see ya.

Monday 24 December 2012

roast chicken roll

Hi everyone,
you know sometimes I get cravings for some quick and easy sandwich, but the problem is I don't usually buy any processed meat like mortadella or other rolls from shops.
So, I did make roast whole chicken, but it is more suitable for dinner or some occasion.
So i asked myself, there is roast turkey (chicken) in shops, why not making it at home.
I was surfing  through internet, trying to find any recipes that even slightly resembles what I wanted to cook. Couldn't find any, well I saw turducken which actually looked a bit odd, but seemed tasty. Anyway I wanted to use only chicken so I had to improvise.
I bought fresh whole chicken. I wanted boneless chicken meat wrapped in chicken skin to shape.
So I washed the chicken and started skinning it. Make sure that the knife you use is really sharp, it will help you a lot.
So I started by cutting the skin across the breast. Then the skinning itself comes. If I can anyhow compare it with anything, I would say it is like taking off a sleep suit or a shirt. First you start from the breast and slowly and steadily pull the skin towards wings.  Help yourself with a knife but try not to cut the skin, remember we want it intact, one piece. When it comes to wings or legs (later) it can be a bit tricky. What I did I skinned the place where wings (legs) attach to the body and then cut them off and pulled them removing the skin. Don't worry much if the skin tears on upper part of wings you already have enough skin from the lower part to cover this hole. After wings skin the back, use the knife around the tail, I cut the tail itself leaving it attached tot he skin. The last will be legs. I left fat on the skin as you know chicken breast is quite dry when cooked and I wanted my roll to come out moist and soft.
When you are done with skin and after admiring your own abilities to do so, you can start deboning the chicken. Remove breast meat, meat from legs and thighs and wings if possible. If you have too little meat on wings, leave it, don't bother removing it.

** I don't throw bones, you can make really simple and yummy chicken noodle soup. So you can keep the bones aside for now or go to this recipe to start making soup alongside this roll. **

So now you have the chicken skin and meat separate and it is time to assemble the roll.
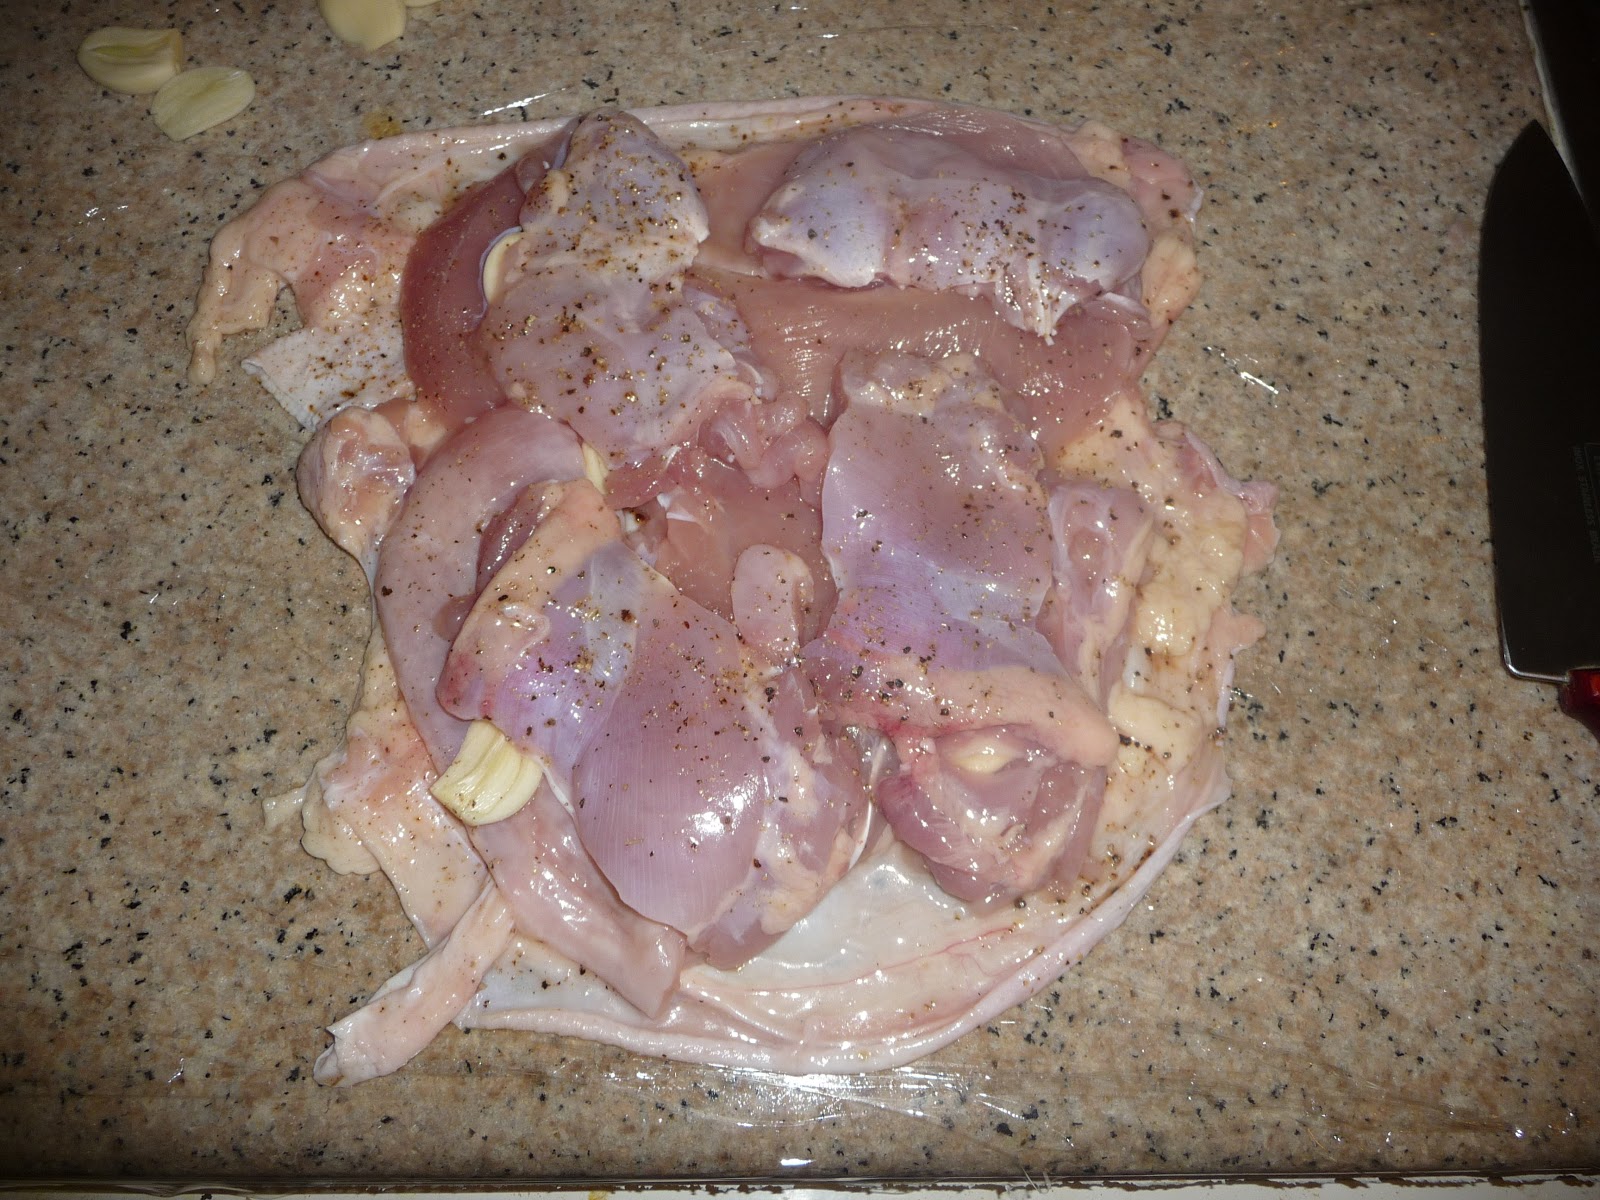
I covered the working surface with cling film (it is easier to roll later and your table stays clean). I spread the skin on the film, seasoned with salt and pepper. It's meat time now. let's start with chicken breast, you know how it can be easily divided into halves, then I cut a thicker part into halves again. I laid them on the skin. I didn't use a lot of various spices, just crushed sea salt, freshly crushed black pepper and some garlic (I cut each garlic clove into 3 slices lengthwise).
Sorry I was so busy with the process that didn't take any single picture till this point.
So season the chicken breast with salt and pepper, put some garlic slices here and there,

 and cover with thigh and leg meat. Again salt pepper and some garlic. 
You can use any spices you'd like, such as red chili powder to make it spicy or maybe a sprinkle of rosemary or thyme which beautifully complement the taste of chicken. I wanted to make it simple.
Now it is time to roll all this yumminess. Roll it the same way as sushi roll, using cling film to shape, Try to keep the skin on top of the roll. when done wrap like candy in cling film and let it sit, marinating for some time (I think I left it for about 30 minutes.)

After some time remove the film and you will see it hold its shape well.

I still secured the skin with some toothpicks.
Preheat the oven to 200C. Put some wax paper on the oven tray, spray with oil and place the chicken roll
and spread a bit of oil on top as well.
I put the roll in the preheated oven for about 10 mins till it gets the shape and begins to brown. The I lowered the temperature to 165C and let it cook through. I honestly have no idea how long it was in the oven, but I checked the temperature inside and it was 77C and when pricked with a toothpick the juices ran clear. Turn off the oven and leave it for some time to rest.
Take out and slice. The chicken turned out to be very moist and tender.

I reserved the juice to make some gravy for mashed potatoes or rice.
Uffff I think that's all.
Let me know I you cooked it, whether you liked it or not and if anything is not clear.
See ya!


Friday 21 December 2012

easy garlic yogurt roast chicken

Hello everyone, anyone. :)
I was a bit busy yesterday so didn't have much time to think of complicated multiple dish dinner. I had some half frozen chicken thighs in the fridge and knew I was gonna make something with them. As the time was coming closer to my husband to come home I needed something quick and easy while I was on my project. (seems like crafting is more important than eating? ;))
So I just made fast yogurt marinade, washed thighs, left the skin on, tossed them in yogurt, let them to sit there for a while, put them in the oven and cooked. I was actually still kind of busy with my project and then with my baby.

So you will need:
8 chicken thighs, bone-in, skin-on (900g)
350 - 400 grams plain yogurt
5-6 medium size garlic cloves
25-35 black and white whole peppercorns (about 1 tsp I would say)
1 tsp sea salt (I used fine one, but coarse will do as well)
20-25 whole coriander seeds (I guess it is about 1/3 teaspoon)
your mortar, deep bowl and oven.

First a washed chicken, left the skin on, it helps to preserve juices inside chicken.
Put pepper, salt, coriander and garlic cloves in your mortar and make paste. (I have a marble mortar which I really love but it is a bit noisy. Using it becomes a big issue when my baby is asleep, so I usually go to the room, not the one where my baby is sleeping, sit on the carpeted floor and mash everything. this way it is much quieter and easier. Well at least for me.) Anyways.

After making a paste, mix it with yogurt in a deep bowl, toss the chicken in and let it marinade for some time. I would say 30 minutes at least.
When the chicken is ready to be cooked, place it on the oven tray and bake at 200C.
I usually have some yogurt left, after about 20 minutes in the oven I put the rest of yogurt marinade on the chicken.
After 35 minutes of cooking the thighs were getting beautiful golden color from outside but were not yet cooked through, so I decreased the temperature to 180C for additional 15 minutes or so. I am not sure how long it was in the oven but it is easy to check if your chicken is cooked through. Just prick it with a fork and if the juices run out clear, without blood then it is all done and yummy.
Hope you will enjoy this recipe.

Let me know if you liked it.

By now take care there...

P.S. Sorry, no picture. We ate it (not the picture of course).

Wednesday 19 December 2012

handmade room decoration piece Love Petals

Here is piece I created to decorate my room. I think I saw some similar idea in Ikea but definitely didn't want to buy it from there but give it a try by myself and have my own twist.
For this project I used petals from small silk roses of 3 different colors, thick cardboard for the background, twine and bamboo sticks for the frame and hanger.

I made this piece a few years back. Now I am thinking of some ideas in the same technique I used to decorate other rooms or maybe to create a lovely gift for some special occasion.
If you are interested to know a bit on how I made it let me know I'll do my best to answer all questions.
I'll post other ideas if I come up with any. But for now...
take care there ;)

inexpensive homemade shopping pad

Hi there anyone who is reading this post.
Today I would like to share inexpensive trick which is also quite handy.
It's how to make a fast, inexpensive and useful shopping pad at home. (well you can actually use this pad for anything you want to take note of.)
Nowadays you can find big variety of magnetic pad in stores, they can be fancy and glamour, but quite expensive. Well you can always type it down in your mobile but it usually turn out be somewhere else when you need to take a note. I think magnetic pads which are easily hung on your fridge are still much easier and more handy. Anyways, too many words and no action... :)
If you ever use shopping pads and would love to continue using there, here is a way to save some money.
You will need 3 things only:

  • a note pad with perforated sheets (I got mine in the nearest stationary for very cheap, don't remember how much though)
  • a glue gun
  • two magnetic strips (I think I got mine from the store bought pads I had before)

One strip might be enough if the magnet is strong, I prefer to be safe and not to look for my notes somewhere on the floor or under the fridge.

 The good thing about these magnets that when your pad is finished you can just remove the strips, take off glue (it come out very easily, you just need to pull it on one end) and reuse it again. 


Let your glue gun warm up
 and please be careful, for some reasons hot glue always turns out stick very well to fingers and be very hard to remove BEFORE you get a burn. Believe me I was through this. :)
Prepare your pad and see where you'd like your magnets to be, I put one on top and one at the bottom of the cardboard, at the backside of your pad. ( I marked the places just for you to see, I usually don't do that)

Now apply generous layer of glue on the back side of your magnetic strips
and press them to the place you want them to be and voila!
I didn't but any special pen either, just took the one I already had and with few moves attached it on the side of the pad.
Here is my pad. Read to use :)


Hope you'll find it useful and easy. For any question please fell free to contact me. I will do my best to answer asap.
Take care there. ;)


About blog

I created this blog as my little hub to post and share different tips and ideas on crafts and beauty, perhaps some recipes and techniques I use in my everyday life.
Hope this will be interesting and useful for all of you there.
Related Posts Plugin for WordPress, Blogger...